Two-Layer Security Model
88Pay uses a dual authentication system to protect your transactions:Layer 1: API Credentials
Long-lived identifiers
- API Key (never expires)
- Merchant ID (unique to your account)
Layer 2: Access Tokens
Short-lived authorization
- JWT tokens (60-second lifetime)
- Session IDs (paired with tokens)
Every API request requires both an access token and session ID in headers.
Authentication Flow
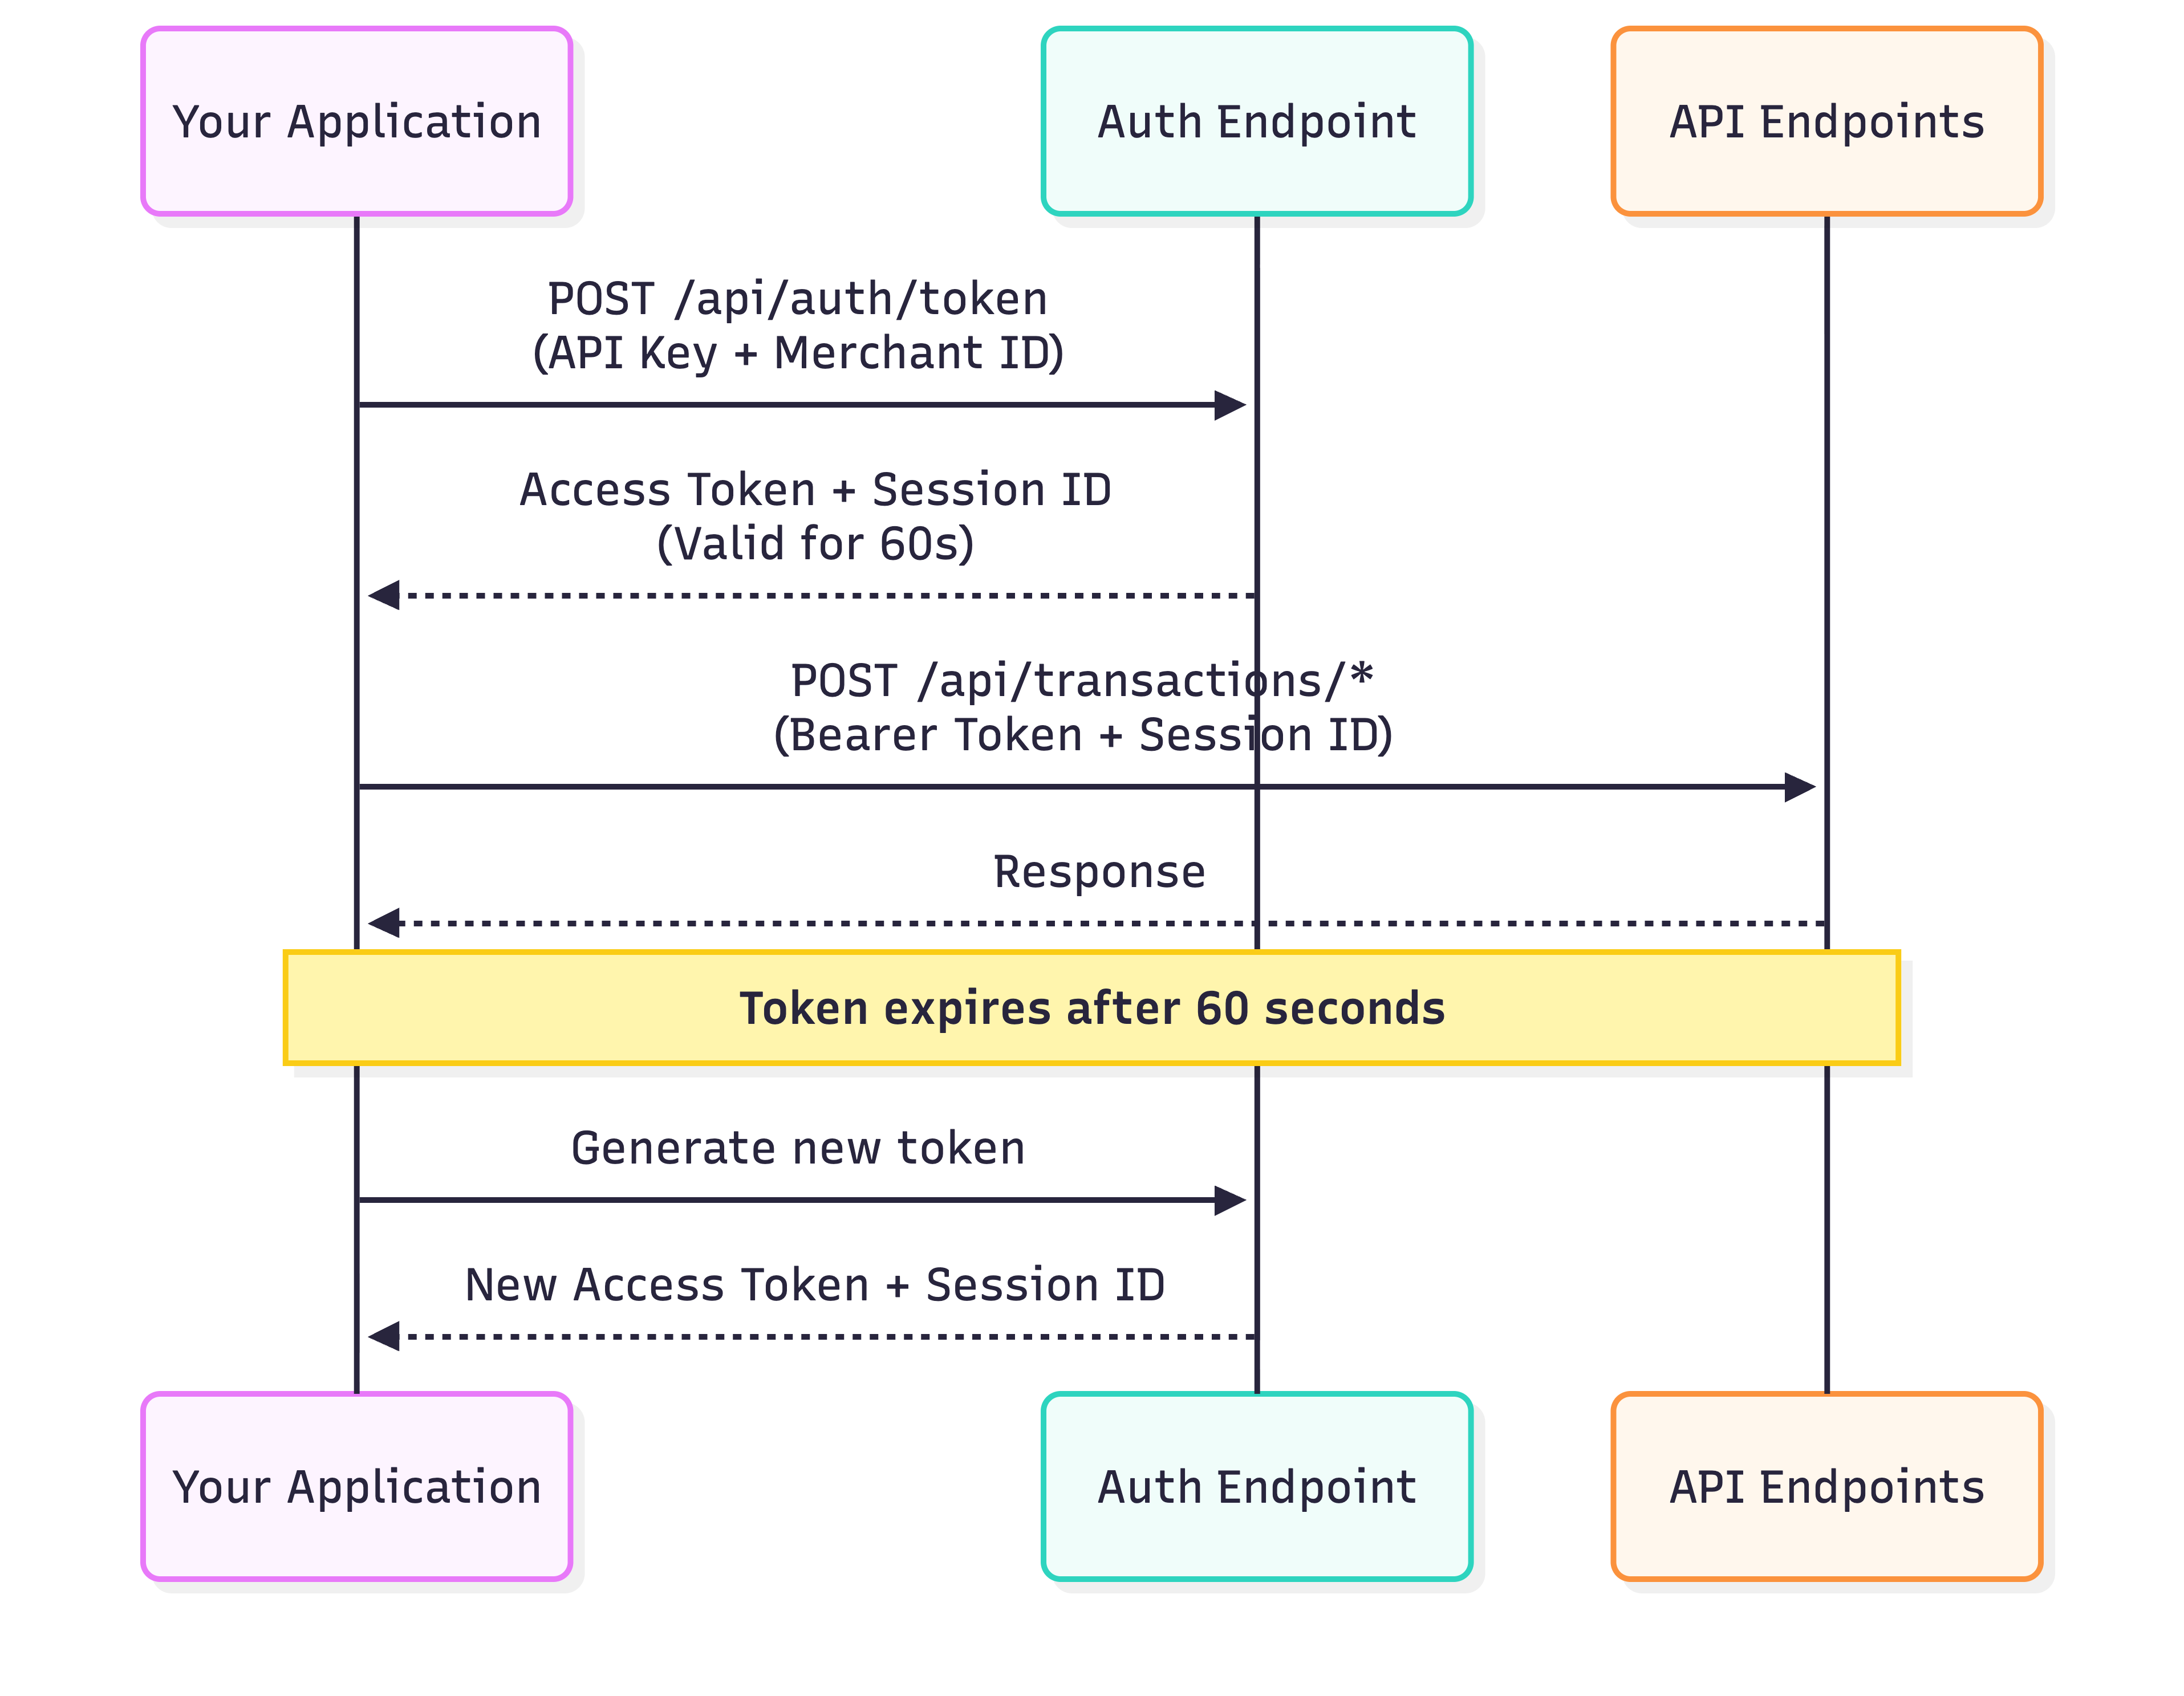
- Exchange credentials (API Key + Merchant ID) for a token
- Use token + session ID to make API requests
- Token expires after 60 seconds
- Generate new token as needed
Getting Your Credentials
Login to Dashboard
Visit dash.88pay.io and sign in
Generating Tokens
Endpoint
- Sandbox
- Production
Request Headers
| Header | Type | Description |
|---|---|---|
x-api-key | string | Your API Key (starts with sk_test_ or sk_live_) |
x-merchant-id | string | Your Merchant ID (format: MCH-XXX-XXX) |
Code Examples
Response
- Success (200)
- Invalid Credentials (401)
- Account Suspended (403)
- Rate Limited (429)
Using Tokens in Requests
Include the token and session ID in all API calls:Required Headers
| Header | Value | Example |
|---|---|---|
Authorization | Bearer {access_token} | Bearer eyJhbGci... |
x-session-id | {session_id} | sess_53a2cfc4... |
Content-Type | application/json | Required for POST/PUT |
Example API Call
Token Lifecycle Management
Lifecycle Stages
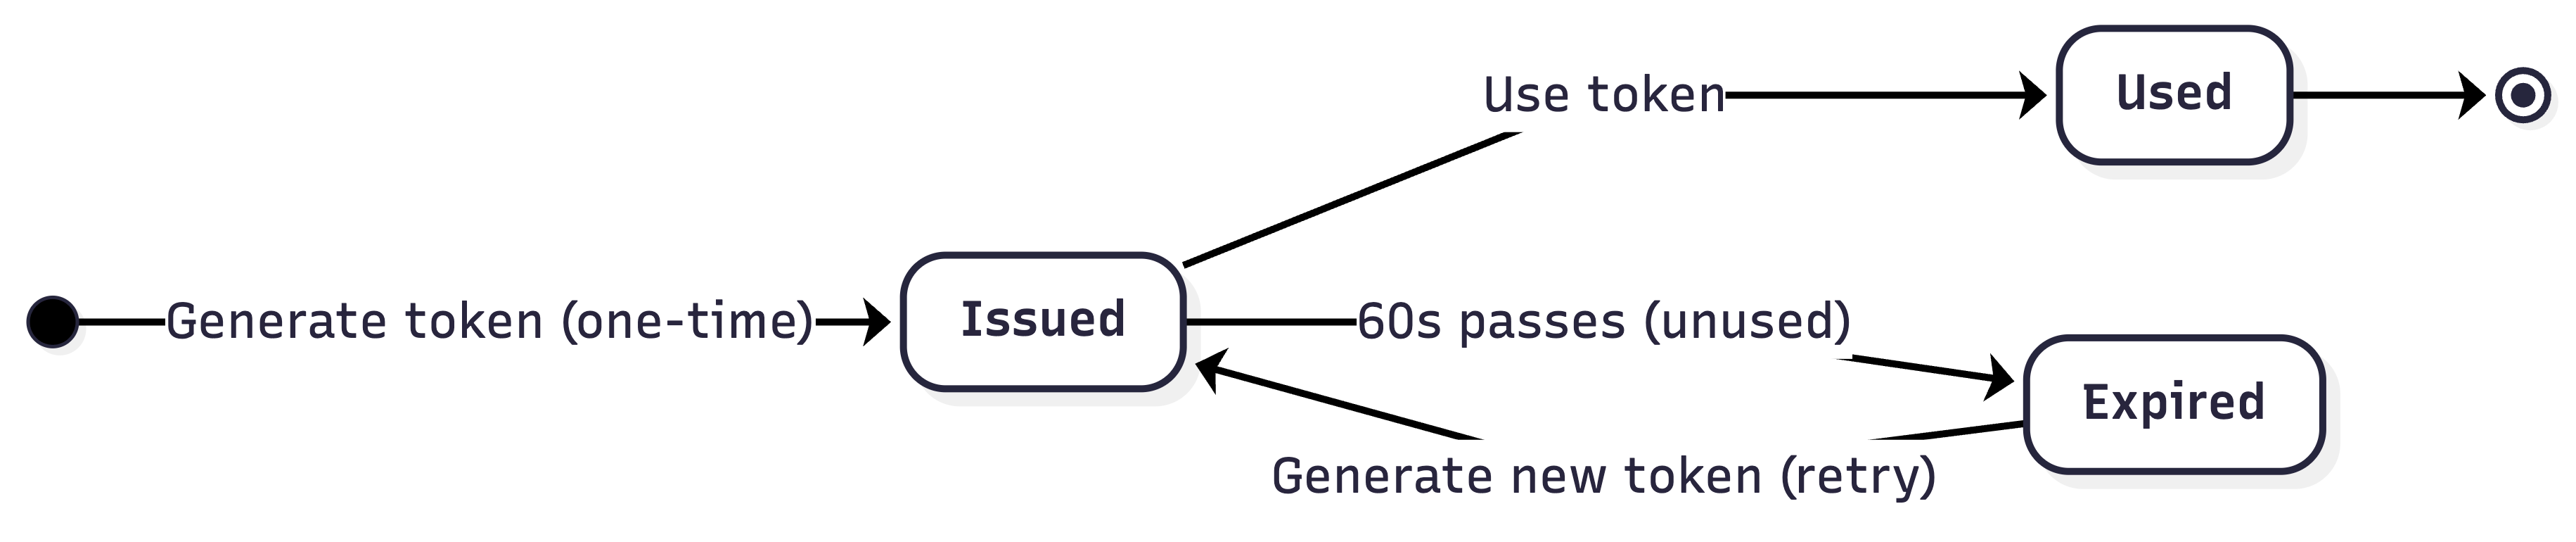
Token Caching (Recommended)
Cache tokens for 50 seconds to avoid rate limits:Security Best Practices
Use Environment Variables
Use Environment Variables
Never hardcode credentials:
Add to .gitignore:Server-Side Only
Server-Side Only
Backend handles authentication:
HTTPS Enforcement
HTTPS Enforcement
- All requests must use
https://(nothttp://) - HTTP requests are automatically rejected
- Valid SSL certificates required in production
IP Whitelisting (Production)
IP Whitelisting (Production)
Enable in Dashboard → Settings → Security:
- Add your server IPs (IPv4 and IPv6)
- API rejects requests from non-whitelisted IPs
- Update list when scaling infrastructure
Key Rotation Policy
Key Rotation Policy
Recommended schedule:
- Rotate every 90 days (proactive)
- Rotate immediately if compromised
- Keep old key active for 24h during transition
- Generate new key in dashboard
- Update environment variables
- Deploy changes
- Deactivate old key after 24h
Monitor & Alert
Monitor & Alert
Track suspicious activity:
- Unexpected 401/403 errors
- Rate limit hits (429 errors)
- Requests from unknown IPs
- Failed authentication attempts
- Sentry, Datadog, New Relic, etc.
- Set up alerts for auth failures
Environment Configuration
- Sandbox
- Production
Purpose: Testing and developmentFeatures:
- No real money transferred
- Test cards/accounts available
- Instant transaction approvals
- Relaxed rate limits
- Separate dashboard section
Rate Limits
| Timeframe | Sandbox | Production |
|---|---|---|
| Per minute | 10 tokens | 10 tokens |
| Per hour | 100 tokens | 100 tokens |
- Returns
429 Too Many Requests - Retry after 60 seconds
- Implement exponential backoff
Testing Checklist
Verify Credentials Format
- API Key:
sk_test_...(sandbox) orsk_live_...(production) - Merchant ID:
MCH-{COUNTRY}-{ID} - No extra spaces or line breaks
Test Token Generation
- Successful response (200 OK)
access_tokenis a valid JWTsession_idis a UUIDexpires_inequals 60
Test API Requests
- Include
Authorizationheader - Include
x-session-idheader - Successful transaction creation
Troubleshooting
401: Token expired or invalid
401: Token expired or invalid
Symptoms:Causes:
- Token older than 60 seconds
- Malformed Bearer header
- Wrong token for environment
- Generate fresh token
- Check header format:
Authorization: Bearer {token} - Verify environment (sandbox vs production)
401: Invalid credentials
401: Invalid credentials
Symptoms:Causes:
- Typo in API Key or Merchant ID
- Using production keys in sandbox (or vice versa)
- Extra whitespace in credentials
- Copy credentials directly from dashboard
- Trim whitespace:
apiKey.trim() - Check environment matches credentials
Missing x-session-id header
Missing x-session-id header
Symptoms:Solution: Always include session ID from token response:
429: Rate limit exceeded
429: Rate limit exceeded
Symptoms:Causes:
- Generating tokens too frequently
- Not caching tokens between requests
- Implement token caching (see example above)
- Wait 60 seconds before retry
- Use exponential backoff for retries
What’s Next?
Create Payment
Start processing transactions
Webhooks Setup
Receive real-time notifications
Error Handling
Handle failures gracefully
API Reference
Explore all endpoints